Home > News and Media > News and Events > Control Technology for Protruding Amount of Matched Angular Contact Ball Bearings
Abstract: The protruding amount measurement and grinding process for high precision matched angular contact ball bearings are key means of quality control during production process. Based on accumulation of theoretical knowledge and practical experience in design, production, testing and instrument design of angular contact bearings for many years, the differences among measuring methods for protruding amount at home and abroad are compared, it is a mistake to treat loading verification during grinding process as protruding amount measurement. The measurement of no-load protruding amount is a reasonable measurement method during production of matched angular contact ball bearings.
Key words: rolling bearing; angular contact ball bearing; match; load; protruding amount; measurement; control.
Since the 1980s, with the rapid development of CNC lathes and milling machines, high-speed, high-precision, and high-rigidity spindle systems have been widely used. Consequently, high-precision angular contact ball bearings emerged, with their core technology focusing on controlling the bearing’s protrusion amount.
1. Control of Protrusion Amount
For high-precision angular contact ball bearings, the process steps for measuring and grinding the protrusion amount are:
1)Design and calculate the protrusion amount. Currently, the theoretical formula for calculating the protrusion amount δ (the theoretical unloaded protrusion amount) used by major bearing companies worldwide is consistent:

where F is the preload, N, Z is the number of balls; α is the contact angle; Dw is the diameter of the ball, mm.
2)Validate with a loading device. Start loading a set of finished bearings from zero. When the axial displacement between the inner and outer rings reaches the theoretical preload, and it matches the designed protrusion amount, this value is then considered as the unloaded protrusion amount. If inconsistent, the bearing’s design parameters need to be modified and revalidated.
3)Measure between processes using an unloaded protrusion amount instrument. If it does not meet the design requirements, grinding is required. After grinding, the bearing ensures qualified protrusion amount and achieves equal height for both inner and outer rings.
2. Misconceptions in Domestic Protrusion Amount Measurement Technology
Currently, some China domestic enterprises mistakenly use the load verification device as a protrusion amount measuring instrument, substituting load verification for protrusion amount measurement. This misunderstanding and operation have several disadvantages:
1)The design principle of early load verification devices in China had theoretical errors, not conforming to Abbe’s principle, resulting in low measurement accuracy.
2)In the grinding process, there is a significant discrepancy between measured values and calculated values. To enhance the dynamic load capacity, angular contact ball bearings often have 3 to 4 more balls than deep groove ball bearings of the same size (final assembly is hot-mounted). Like deep groove ball bearings, angular contact ball bearings have a maximum ball filling angle issue. The number of balls cold mounted during the grinding process is not the same as the designed number. Omitting 3 to 4 balls greatly affects the protrusion amount measured under the load verification device. However, the measurement load for unloaded protrusion amount is very small, making this error due to the number of balls negligible.
3)In the load-type protrusion amount measurement method, the load value is the bearing preload. This large load can increase the deformation of the groove, especially in large bearings (e.g., B7244E, where the heavy preload force in the FAG sample is 24,979 N). Therefore, protrusion amount variations caused by poor groove shape are not reflected in the load-type protrusion amount measurement method.
4)Load-type protrusion amount measuring instruments are bulky, generally used as laboratory verification devices, and not suitable for mass production of bearings. Moreover, years of domestic and international verification have shown that the relative error of the theoretical protrusion amount calculation formula is quite precise (up to ±5%). Some bearing samples’ protrusion amounts are based on internationally accepted theoretical formulas and do not require verification. Therefore, the practical significance of load-type protrusion amount measurement as a verification device in actual production has been lost.
3. Basic Principle of Protrusion Amount Measurement
If an angular contact ball bearing set has equal height for both inner and outer rings and symmetrical grooves, the unloaded protrusion amount of this bearing set is half of the unloaded axial clearance. Therefore, the principle of measuring the protrusion amount in angular contact ball bearings is consistent with that of measuring axial clearance in deep groove ball bearings. Essentially, measuring the protrusion amount is equivalent to measuring the axial clearance of angular contact ball bearings. Some companies abroad even directly refer to the measurement of paired bearing protrusion amount as “measuring the axial clearance of combined angular contact ball bearings”.
After years of in-depth research by bearing enterprises worldwide, the same conclusion has been reached regarding the measurement of radial and axial clearance in angular contact ball bearings: as long as the measurement principle conforms to Abbe’s principle and the loading force is kept minimal (generally not exceeding 10 N), it can be assumed that the measured values are consistent with the calculated values.
4. Unloaded Protrusion Amount Measurement Method
Unloaded protrusion amount measurement is a primary quality control method in the production of paired bearings. Recognized by several major bearing enterprises worldwide, the single and double standard part protrusion amount measurement methods share the same principle. These methods feature simple instrument structure, low cost, ease of operation, and are suitable for mass production of bearings, particularly for protrusion amount fitting during production.
4.1 Portable Single Standard Part Protrusion Amount Measurement
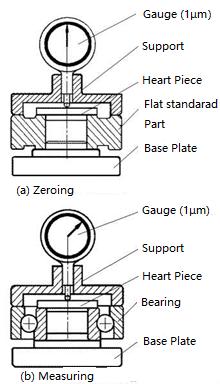
The portable single standard part protrusion amount measurement method, as used by companies like FAG and SKF, is illustrated in Figure 1.

Fig.1 Measuring diagram of protruding amount of portable single standard part.
The flat standard part is a ring-shaped piece with the same nominal inner diameter, outer diameter, and width as the bearing being measured. Its end face parallelism and perpendicularity tolerances should not exceed 1 μm; the flatness tolerance of the heart piece should also not exceed 1 μm. During operation, the outer ring of the bearing should be slightly shaken or rotated to eliminate friction errors. The stable reading on the dial gauge is the measurement value of the unloaded protrusion amount. This method has several advantages:
1)The support can be made into a thin-walled shape, lightweight, and portable.
2)The tool is calibrated before each measurement, allowing for real-time correction of tool deformation, ensuring high reliability and minimal error.
However, the dial of the portable single standard part protrusion amount measurement device has a high center of gravity, is not an integral structure with the support, and its center of mass is not on the measurement centerline, leading to unstable measurements for small and miniature bearings.
Therefore, considering the advantages and disadvantages of the portable single standard part protrusion amount method, it is recommended for use with angular contact ball bearings with a nominal inner diameter greater than 30 mm.
4.2 Double Standard Part Protrusion Amount Measurement
4.2.1 Measurement Principle
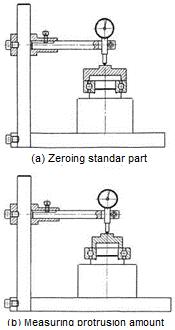
The measurement method for the double standard part protrusion amount instrument is shown in Figure 2, as used by companies like NSK and TOYO. This method utilizes two equal-height standard parts: one for zeroing and the other for measuring the protrusion amount. During the operation, like the single standard part method, the outer ring of the bearing needs to be slightly shaken or rotated to eliminate friction errors. Measurements are taken once the reading stabilizes.
This method, using two standard parts, allows for more precise adjustments and measurements. The first standard part sets the baseline or zero point, ensuring that any measurement taken with the second standard part is relative to a known reference, enhancing the accuracy of the protrusion amount measurement. This approach is particularly useful in ensuring consistency and reliability in measurements, especially important in high-precision bearing applications.

Fig.2 Measuring diagram of protruding amount of double standard parts.
The double standard part protrusion amount measuring instrument integrates the dial gauge and the platform, eliminating the issue of the gauge’s center of gravity not being aligned with the measurement centerline. This makes it particularly suitable for measuring the protrusion amount of small and miniature bearings. However, when using this instrument, the dial gauge and measurement platform must be used together, and it requires two equal-height standard parts, making it less portable.
4.2.2 Integrated Standard Part
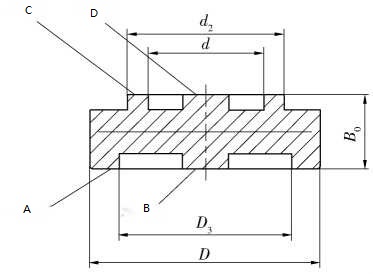
To optimize the operation process, based on the double standard part measurement principle, the two standard parts are combined into an integrated structure. This design eliminates the need to switch parts during operation; flipping the standard part suffices.
The integrated standard part is shown in Figure 3. In the figure: B0 is the width of the bearing being measured, d is the inner diameter, d2 is the outer diameter of the inner ring, D is the outer diameter, and D3 is the inner diameter of the outer ring. To ensure measurement accuracy, planes A and B, C and D must be of equal height, and the flatness difference between standard part planes must be controlled within 1 μm. If the precision is not well controlled, any difference between the two planes will be directly reflected in the protrusion amount measurement, leading to measurement errors.

Fig.3 Integrated standard part.
This integrated approach simplifies the measurement process while maintaining accuracy, especially beneficial for high-volume production environments where efficiency and precision are crucial.
4.2.3 Summary
Considering the advantages and disadvantages of the double standard part protrusion amount measurement method, it is recommended for use with angular contact ball bearings where the nominal inner diameter does not exceed 20 mm. This method is particularly suitable for small and miniature bearings due to its integrated structure and precision, making it a reliable choice for high-accuracy requirements in bearings with smaller dimensions.
5. Development Trend of Protrusion Amount Control Technology in Paired Angular Contact Ball Bearings
In conventional production processes, the grinding and pairing of angular contact ball bearings is a time-consuming and labor-intensive task, leading to high production costs. However, extensive measurements and analyses of foreign bearing samples have revealed that some international companies have achieved the designed protrusion amount without the need for grinding, marking a significant breakthrough in the production of high-precision angular contact ball bearings. In China, some angular contact ball bearing enterprises have also developed non-grinding processes, achieving minimal to no grinding in paired bearings. For high-precision bearings, up to 90% can be produced without grinding. This not only saves manufacturing costs but also enhances product competitiveness, making it highly valuable for application in the production of paired bearings.
It is foreseeable that with continuous advancements in equipment and technology, future paired bearings will have only one type of protrusion amount — U0 protrusion amount (i.e., unloaded protrusion amount of 0). U0 protrusion angular contact ball bearings will not only simplify the bearing production process and reduce inventory classification for easier management, but also simplify the ordering process for spindle manufacturers, who will no longer need to specify light, medium, or heavy preloads. Bearing manufacturers will address the varying preload requirements by providing inner and outer spacers of different thicknesses, facilitating the assembly of shaft systems with diverse performance characteristics. This approach represents a significant step towards more efficient and versatile bearing production and application.
References:
1.Rolling Bearings – Technical Conditions for Paired Angular Contact Ball Bearings: GB/T 32334—2015 [S].
2.Fan Yuqing, Ma Ying, Wei Chuang, et al. “Control Method of Inner Ring Grinding Amount for Flanged Outer Ring Double Inner Ring Double Row Angular Contact Ball Bearings” [J]. Bearing, 2020(2): 7-9.
3.Tong Nan, Zhang Yuanjun, Wang Dongfeng, et al. “Analysis of Influencing Factors on Protrusion Amount of High-Speed Light Load Angular Contact Ball Bearings” [J]. Bearing, 2017(11): 1-3, 8.
4.Ao Zhenghong, Wang Hongqiang, Zhang Deying, et al. “Processing Methods of Protrusion Amount for Angular Contact Ball Bearings with Different Pairing Methods” [J]. Harbin Bearing, 2018, 39(4): 19-23.
5.Ma Fujian, Deng Sier, Liu Qiaofang, et al. “Structural Design of Angular Contact Ball Bearing End Face Protrusion Amount Measuring Instrument” [J]. Bearing, 2006(3): 25-27.
Send a message directly to us. We will contact you at once.